There is an age-old debate over whether rifle maintenance is necessary or not. This is a contentious issue and a subject on which there are numerous opinions and many answers. Ask a dozen rifle owners and you will undoubtably get a dozen different answers. So today’s question is: should you clean your rifle, and if so, then how often and in which manner?
Dirty barrels are probably the number one reason that otherwise good shooting rifles turn bad, and they certainly do require regular cleaning. The frequency and method of cleaning varies from one shooter to the next, but one thing that we do know is that it is crucial to clean the barrel and working parts in order to sustain accuracy and prolong service life. Failing to do so may result in a worn-out, pitted and inaccurate weapon system. My recommendation is to perform a regular clean after each shoot, and a deep clean every 300 rounds or so.
As the shooter, it is your responsibility to determine exactly how often a clean is required, and then to keep cleaning intervals consistent. The cleaning regime that you decide to follow will most likely vary from caliber to caliber. I will discuss my cleaning regime below, and also explain exactly what tools are required to properly clean your rifle and ensure that it is well taken care of.
How Often Should You Clean Your Rifle?
Before discussing how often to clean your rifle, let’s first touch a little more on why cleaning is necessary.
As you fire a rifle, it gets dirtier and dirtier (duh). Fouling begins to fill the barrel’s pores in the metal, depositing copper from the bullet and carbon from the powder residue, which embeds as further firing takes place. This eventually leads to a point where consistency is lost, and a clean is required. If neglected, moisture will set in over time and eventually cause pitting.
So now let’s answer the question: how often should you clean your rifle?
While some shooters stick to one extreme, by often over-cleaning their barrels and firing the majority of their rounds only through bare metal, others tend to avoid cleaning altogether. This is often because shooters tend to follow whichever rituals they are told, remaining stubborn and reluctant to change.
My recommendation is to find a happy medium between the two, whereby a regular clean and light oil should be followed after each shoot; before the rifle goes back into storage, and then every so often perform a deep clean, approximately every 300 rounds or so.
What Equipment Do You Need?
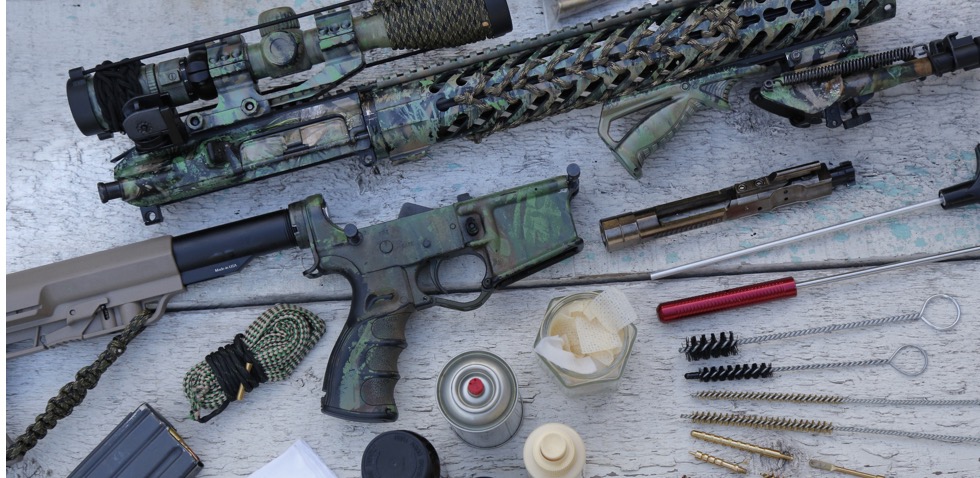
The following equipment is required to properly clean your rifle and its barrel:
- One-piece quality barrel rod that spins freely (caliber specific)
- Chamber guide (optional, not required)
- Nylon bore brush (caliber specific)
- Bronze brush (caliber specific)
- Spear-tip or wrap style jag (caliber specific)
- Cleaning patches
- Carbon cleaner (discussed below in more detail)
- Bore cleaner (discussed below in more detail)
- Solvent and degreaser (discussed below in more detail)
- Lubricant and preservative (discussed below in more detail)

Carbon Cleaner – removes carbon fouling deposits from the bore. To be used during regular cleaning. Carbon fouling over time can become rigid, thus causing irregular groove depths and variations in muzzle velocities. This may affect your shot placement.
Bore Cleaner – a combined product which removes both carbon fouling and copper deposits. To be used during a deep clean. Carbon fouling and particles of copper can form layers. An appropriate layer of copper can aid in consistent velocities, however too many layers can cause negative concerns as per heavy carbon fouling.
Note: copper cleaner can corrode your barrel if left to sit for too long. 10 to 15 minutes should be enough time, but avoid leaving it to soak overnight.
Bore Cleaning Foam – removes carbon, copper, and other residues effectively from the barrel through a chemical reaction. Follow cleaning instructions as per the product description.
Solvent & Degreaser – removes residue loosened by carbon and copper cleaning products. Should be used after a carbon or bore cleaner is used.
Lubricant & Preservative – a long lasting lubricant which penetrates and dramatically reduces adhesion of sand, grit, and other abrasives which can otherwise cause wear and damage.

The Regular Cleaning Regime
The steps for post-firing carbon removal can be seen below, and should be followed at the end of each day’s firing.
- Safely clear the rifle and remove the bolt. Insert your chamber guide if you have one.
- Saturate a nylon brush in carbon cleaner an attach it to the end of your barrel rod. Pass it through the bore back and forth a number of times to loosen large carbon deposits.
- Remove the brush from the rod and wipe the rod down with a rag.
- Attach a jag and a dry patch, and pass it through the barrel a number of times, mopping up the dirt and grime that has been loosened. Once you are happy, unscrew the jag from the end of the rod before pulling it back through the barrel. This prevents the jag from scraping against the crown.
- Place a bronze brush onto the cleaning rod and pass it through the barrel a number of times. No cleaning solution is required during this step.
- Replace the bronze brush with a jag and a wet patch soaked in carbon cleaner, and pass it through the barrel a number of times, scrubbing the barrel to remove any further stubborn areas.
- Attach a dry patch and pass it through the barrel a number of times, mopping up the dirt and grime once more. It should come out black in colour due to the carbon fouling.
- Repeat steps 2 to 7 once again.
- Attach a dry patch and pass it through the barrel, inspecting the cleanliness of the patch. Repeat the above process if necessary, until the patch comes through clean.
- Once cleaned, run one last lightly oiled patch through the barrel to protect it once stored.
- Clean the chamber with some patches or a cleaning rag.
- Use a wet patch or rag to clean the barrel’s crown.
- Wipe out the inside of the action.
- Wipe down the bolt and apply a small amount of lubricant to the lugs and bolt body. Avoid lubricating the bolt face; this must remain dry.
The Deep Cleaning Regime
As we have already mentioned, it is recommended to occasionally deep clean your rifle in order to prevent excessive layers of copper buildup. Use the following steps as a guide to deep clean your rifle.
- Complete steps 1 to 9 as per the regular cleaning regime above.
- Attach a jag with a wet patch soaked in copper remover or bore cleaner, and pass it slowly through the barrel.
- Allow the solution to soak into the barrel for 10 to 15 minutes. Caution: do not leave this to soak for too long as it can start to corrode the barrel.
- Attach a dry patch and pass it through the barrel. You should notice that it comes out blue/ blue-green in colour. This is due to the oxidisation and removal of the copper.
- Attach a nylon brush saturated in a solvent and degreaser solution. This will clean out the copper remover.
- Attach a dry patch and pass it through the barrel to clean out the solvent.
- Replace with a clean dry patch and pass it through the barrel, inspecting the cleanliness of the patch. Repeat the above process if necessary until the patch comes through clean.
- Complete steps 10 to 14 as per the regular cleaning regime above.
The Pre-Firing Check
Before firing the rifle again, it should be lubricated and checked as follows:
- The exterior of the chamber and barrel must be dry and free from oil.
- The interior of the bore and chamber must be clean and dry. Pull through the bore with a dry patch or bore snake before firing, ensuring that no residue or lubricant remains. Visually look down the bore and make sure that it is free from obstruction.
- Ensure that the face of the bolt is clean and dry.
- Lightly lubricate the remaining surfaces of the bolt.
- Lightly lubricate the action and the working parts of the rifle.
- The stock and scope should remain dry.
- Make sure that the scope mounts are equally spaced, that the scope is affixed to the rail mounting system correctly, and that the scope is correctly tightening to the appropriate torque setting.
The Cold Bore Shot
A cold bore shot, otherwise known as a clean bore shot, is the first shot fired through the barrel after deep cleaning has taken place. When you deep clean your rifle, it strips away all of the copper, carbon, and fouling that sits in the barrel from the very first shot onwards. Your cold bore shot is therefore the only shot that travels through a clean bore, and many shooters will argue that this produces a different point of impact to the subsequent shots.
Others will argue that this slight reduction in precision is a fault of the shooter. Since the cold bore shot is often the first shot of the day, the shooter may not have warmed up yet, which leads to a slightly larger first group of the day. Some shooters (myself included) will spend time dry- firing before their first live shot, stating that this removes the cold bore issue that others may experience.
Either way, it is often evident that some barrels produce a slight deviation from their first shot through a clean bore. This mean that the first grouping of the day may measure 1MOA, while subsequent groupings return to 1/2MOA. It is your job to determine if the cold bore shot differs from usual firing, and if so, is there a pattern in the bullet’s deviation that can be accounted for? If you notice a deviation but cannot account for it, you may wish to ensure that your rifle has been fired before embarking on a hunt where your first shot may be the shot of most importance. If you are able to account for your cold bore shot, record the point of impact shift in your data book and adjust where necessary.
If you enjoyed reading this post and found it useful, don’t keep it to yourself; help us spread the word – select a social share button below. And should you wish to share your thoughts or ask a question, scroll down and leave us a comment 🙂
2 thoughts on “When & How To Clean & Maintain Your Rifle”
I read a good deal of posts here. Probably you spend
a whole lot of time writing, Thanks for sharing!
King regards,
Thomassen Dencker
Thanks for the wealth of info you have posted, very interesting and as a long time shooter, I still learn each time i read your posts, thank you so much and don’t stop them coming!