Precision rifle setup can be a daunting process for a newbie, and without expert guidance it can be difficult to ensure that all bases are covered. Today we are going to discuss a foolproof method to mounting and zeroing your riflescope. But before we do, let’s tackle the following question: what does it mean to zero a rifle, and why is correct mounting of a rifle scope so important?
Zeroing (or sighting in) a rifle is the process of aligning the scope’s point of aim to the barrel and the bullet’s point of impact so you can accurately engage your target from a set distance. When mounting a riflescope, it is important that this is done correctly to ensure a proper and consistent eye relief, correct levelling of the scope in order to prevent cant issues, and a tight and secure fix between the scope and scope mounts, preventing disruption to your zero.
Scope cant – tilting of a scope – can displace your bullet during long range engagements. A 3-degree cant can cause a bullet to drift as much as 40cm or 15-inches when taking a shot from 800 meters
For more info read: Do I Need a Bubble Level on my Rifle Scope?
While the process is often thought of as complex and mysterious, it is in fact fairly easy once properly understood. It is important to avoid making use of a professional gunsmith for rifle setup, but to rather setup the rifle yourself so that the length of pull and eye relief is tailored to you own individual shooting style. Today we are going to teach you how to achieve this.
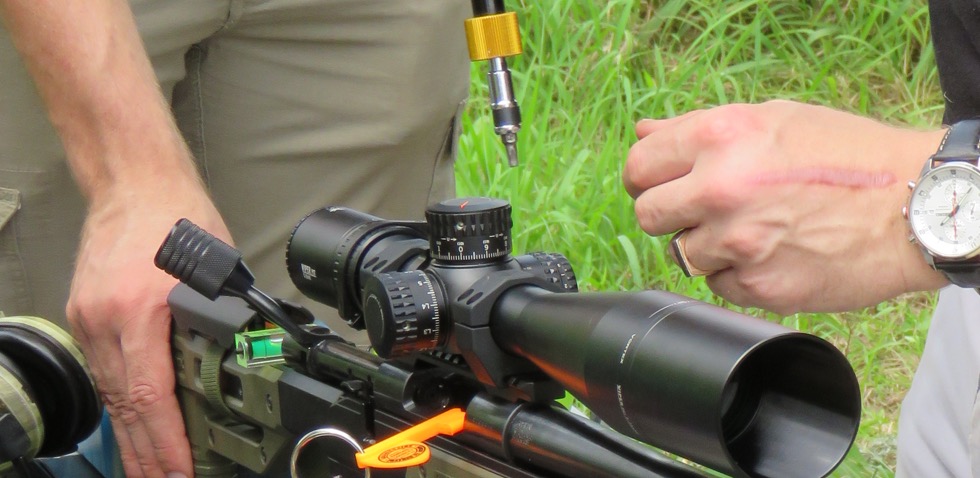
Mounting a Rifle Scope
The first step in rifle setup is to mount the scope onto the rifle. Many rifle owners believe that a gunsmith is required to correctly mount a scope, and many will pay for this service. But when it comes to precision rifle setup, the scope needs to be mounted to fit the style of the intended shooter and should therefore be mounted by the shooter himself. This will ensure the correct eye relief, spot weld, and length of pull, which differs from shooter to shooter. It will also allow the shooter to remove and refit the scope as desired.
To correctly mount a scope, follow the steps below:
- Ensure that all screws, screw holes, mounts, and bases are clean and free from dirt and grease that could reduce tightness.
- Steady the rifle and place it in your preferred firing position, or that which you intend on using post often.
- Ensure that the scope’s base plate (or accessory rail) is tightened to the required setting.
- Secure the scope mounts to the rifle and tighten them to the required setting.
- Next, lay behind the rifle and adjust the height of the cheek-rest, or create your own cheek riser padding to give you the most comfortable spot weld position. An example can be seen in the image below taken from the film: American Sniper. Tape and foam is used to create a cheek riser pad. Once this is achieved, your head placement should be naturally aligned to the scope. There must be no goose-necking (moving your head up or down to align with your scope), as this is an indication of incorrect cheek-piece height.

- Now you can adjust your eye relief. Start by increasing the scope’s magnification to its maximum setting. This is an important step as it allows you to remove scope shadow during the setup process.
- Place the scope as forward as you can in the mounts, but with the ring halves only half screwed together whilst maintaining a clear scope picture. Slowly etch the scope back towards your eye to improve the image and remove any scope shadow. Once there is no remaining scope shadow and you have a clear sight picture, stop. You don’t want to bring the scope too close to your eye, as the recoil may cause injury.
- Tighten the screws further without moving the position of the scope, leaving them just loose enough so that you can rotate the scope by hand.
- Now we must adjust the vertical and horizontal crosshair to eliminate scope cant. Use small keychain spirit levels to first level the rifle, and then level the scope. These tools are cheap and should be purchased and stored in your rifle bag or cleaning kit. It is important to make sure that spirit levels are working correctly by verifying them with other levels. The levels must be placed on the rifle’s flat surfaces, and on top of the scope turret caps. If a hunting rifle has no flat surfaces, do not over concern yourself, as long as you are able to follow Step 11 below.
- Once the scope is perfectly level, tighten the screws alternatively in a criss-cross pattern, maintaining even spacings between the ring halves. Even spacing between the ring halves is achieved by observing either side as you complete the tightening process, adjusting as necessary. If an even spacing is not achieved, the rings can loosen over time due to the rifle’s vibrations. Continue until your screws are tightened to the recommended torque setting, using a torque screwdriver if you have one.
- Check once again that the scope is level, and then attach the scope’s own bubble level and ensure that it is precisely set. Place a level on top of the scope turret cap and use this to calibrate the scope’s own bubble level. Click here to see an image of a scope bubble level.
- You may now reduce the magnification and make sure that you are happy with the final spot weld and eye relief.
- Your scope is now set. Once the first shot has been fired, tighten all screws once more, as this first shot allows the screws to bed.
Note: check all screws regularly and ensure that they do not loosen over time. It is recommended to use a torque screwdriver to prevent over-tightening which may cause damage to the mounts and accessories. If a torque screwdriver is used, tighten all screws before placing the rifle away for storage after each shoot.

How to Bore-Sight Your Rifle
Once your scope is properly mounted and your eye relief is set, you need to complete a bore-sight. Bore-sighting is the process of visually sighting in a rifle before live fire. This is achieved by looking down the bore (or barrel), and is the final step that should be completed before actually zeroing the rife on the range. It will ensure that your rounds land roughly on target with your first shot, saving you both time and ammunition during the zeroing process.
Steps:
- Start by placing your rifle down on a stable surface so that it will not move. There must be an aiming marker in the distance.
- Remove the bolt, and look through the bore of the rifle, perfectly lining up the centre of the bore with your aiming marker (ideally about 100m down range). The item that you have chosen for your aiming marker will appear quite small in comparison to the bore, so it is important to ensure that you place the item perfectly centred through the bore. Pay particular attention to the entire circumference of the barrel to make sure that the chosen aiming marker is correctly centred.
- Without moving the rifle, look through your scope and adjust the elevation and windage turrets until the crosshairs are centred over the same aiming marker. You can ask someone to assist in turning the turrets for you.
- Look through the bore once again, and ensure that it is still centred to the aiming marker, then look through your scope once more and make any fine adjustments. This process can be repeated as many times as necessary to ensure that the aiming marker is central to both the bore and the scope’s crosshair.
- You should now be close enough to start a good zero. It is recommended to fire your first shot at 25m to make sure your bore-sight was accurate. This may save you time and ammo.
Some alternate methods to visually bore-sighting a rifle are as follows:
Use a collimator if you have access to one. A collimator sight is a type of optical sight that allows the user looking into it to see an illuminated aiming point aligned with the device the sight is attached to. It is a quick and simple method of zeroing and check zeroing with no live firing.
Use an in-chamber laser bore-sighting tool. This is a more modern method of bore-sighting, which uses a laser pointer to illuminate the distant point of aim. This method works well as it allows more movement in the rifle during the bore–sighting process; the projected laser dot will not move relative to the barrel, and does not require removal of the bolt.

Note: it is important to understand that bore-sighting is intended to place your bullet holes close enough to your aiming marker in order to prevent ammo wastage when properly zeroing your rifle; to put your rounds on paper. It will very seldom if ever, ensure that your point of aim is equal to you point of impact, and it does not account for bullet drop. A proper zero is therefore required on completion of successful bore-sighting.
How to Zero a Rifle
Zeroing a rifle, otherwise known as sighting in, is the process of adjusting the sights or reticle so that the rifle’s point of aim is equal to the bullet’s point of impact. The principle is to shift the reticle to a position that intersects with the bullet impact at a designated point, known as a zero, so that the rifle will repeatedly hit where it aims at that distance.
Zeroing involves firing a group of shots from a cool barrel, adjusting the sights to move the point of impact onto the point of aim, and repeating the process until a group is centred on the aiming marker.
You can zero your rifle from different distances based on what type of shooting you intend to do. Zeroing establishes an accuracy baseline that you can make further adjustments from. The typical zero distance for precision rifle shooters is either 100 meters or 100 yards.
The Process of Zeroing
Before zeroing a rifle, the scope must be correctly mounted and aligned to the bore. We have already discussed how to mount the scope and bore-sight the rifle. Once this has been achieved, we can select a zero distance and prepare to zero the rifle.
The best time of day to zero a rifle is often in the morning, while the weather is calm. As the day progresses and temperature rises, wind speeds increase. It is always best to zero a rifle with no wind present. However, if wind is present, it can be accounted for by working out the effect that the existing wind speed would have on the bullet’s impact (by use of a ballistics calculator) and removing this value from the turrets on completion of the zero. This may be a click or 2 at most when zeroing at a distance of 100m. If wind is present while zeroing, try to shoot on calms and in-between wind gusts.
The 25 Meter Confirmation Zero
It is always a good idea to start off by firing a single shot at a 25m target to make sure that the bore-sight was a success. This can save a novice shooter plenty of ammo when zeroing at a further distance. Once a 25m shot has been achieved, you may need to take a measurement from the bullet impact to the point of aim, and adjust the scope accordingly. Remember that any adjustments that you make here should be made for MOA at 25m and not for MOA at 100m. This will bring you close enough to start a good zero at a further distance.
Time To Warm Up
The next step is to fire a couple of practice rounds, or alternatively spend some time dry- firing, focussing on your marksmanship fundamentals. This should ensure a good precise grouping from your first zero attempt, rather than warming up on the actual zero.
Now Let’s Zero The Rilfe
Start the zero by firing 3 to 5 round groups onto an exact aiming marker/ point of aim, adjusting the scope as required after each group. It is important that the shots are fired at a pace that does not allow excessive heating of the barrel. Take your time between shots. Some argue that if the barrel gets too hot it warps ever so slightly, altering the point of impact. Allowing sufficient time for the barrel to cool during the zero process is known as a cold barrel zero, and is the preferred method.
During your zero, never adjust the point of impact after one shot. You need at least 3 bullet holes to confirm that your grouping is tight and consistent, after which an adjustment can be made. Your scope should adjust in the direction that you need the bullet hole to move. Once your point of aim is equal to your point of impact, your zero is almost complete.
Slip Those Scales
Once your scope is zeroed and your point of aim is equal to your point of impact, the turrets need to be slipped back to “0” on the dials. This involves adjusting the turret scales back to zero for both elevation and windage, in a way that doesn’t allow the turrets to grab the adjustment mechanism inside the scope. They need to slip past to prevent altering the zero.
To slip the scales, loosen the turret cap screws (some scopes may not have screws but may rather lift with pressure) and remove the turret cap, replacing it so that the “0” lines up with the indicator mark. Hold the turret cap in place so that it cannot move, and fasten the screws back to their original torque setting (or pop the turret back into place to set the zero).
Finish Off With A Scope Tracking Drill
On completion of zeroing a new scope, or a scope that has been knocked or dropped, we must test the elevation and windage adjustments to ensure they are tracking correctly. This is achieved by conducting a scope tracking drill, such as a box drill or cross drill.
Box Drill – once zeroed, complete a box drill by adjusting the elevation and windage turrets to a set measurement that will allow you to fire a shot upon each alteration, creating a box, and returning to your original zero.
Example:
Up 10 clicks, engage
Right 10 clicks, engage
Down 10 clicks, engage
Left 10 clicks, engage
This should return your shot back to zero
Cross Drill – a cross drill can be used alternatively to the box drill.
Example:
Up 10 clicks, engage
Right 10 and Down 10 clicks, engage
Up 10 clicks, engage
Left 10 and Down 10 clicks, engage
This should return your shot back to zero
Note: measure the distance between shots on target to ensure that they are accurate. You should also adjust the magnification throughout the drill to make sure it doesn’t alter your point of impact.
Once the zero is complete, record all relevant data in your data book. This should include:
- The date of your zero
- The atmospherics, most importantly the temperature
- Position of support
- If a suppressor was fitted
- Any other information that you may find useful
Having this data on record will allow you to make any necessary adjustments later on.
The Check Zero
A well maintained rifle with a quality scope and quality mounts doesn’t need to be zeroed very often. A good quality weapon system should maintain a good zero. A check zero should however be conducted regularly. This involves a single shot at a known distance, with the turrets set so that the point of aim equals the point of impact.
If the check zero is a failure, meaning that the bullet does not impact where you expected it to, then a re-zero may be required.
A check zero should be performed under the following conditions:
- If the scope of rifle has been knocked or bumped
- If the turret screws have come loose and you feel that the turrets may have slipped
- If any adjustments are made to the chassis or cheek-rest/ butt length
- If any alteration or change has been made to ammunition
- If you have separated the action from the stock
- After rough or unsettling transportation
- Before each planned operation, competitive shoot or hunt
- If you are unsatisfied with your point of impact at any stage
If you enjoyed reading this post and found it useful, don’t keep it to yourself; help us spread the word – select a social share button below. And should you wish to share your thoughts or ask a question, scroll down and leave us a comment 🙂