The AR-15 is undoubtably the most ergonomic and modular rifle of our time; the Jeep Wrangler of firearms so to speak. There are few things more satisfying to me then modifying an AR-15; recreating the rifle to turn out a totally personalised and aesthetic tactical shooter. But with so many accessories and upgrades to choose from, the task can undeniably overwhelm – particularly in the hands of a first-time rifle owner. So why the desire to modify an already-brilliant rifle, and which upgrades are most favourable when a stringent budget persists?
The AR-15 – ArmaLite Rifle model 15 – draws the attention of countless gun enthusiasts and intrigued individuals thanks to its unmatched modularity, providing the user with an endless range of upgrades and custom components. Aftermarket modifications & accessories are designed and sold to enhance comfort, manoeuvrability, handiness and performance. The most fundamental upgrades – generally speaking – are optics and weapon-mounted lights, giving the user improved accuracy and low-light usability.
One of the most enticing features of all, is that nearly all AR-15 upgrades are plug & play; they can be installed at home by the majority of motivated gun owners. So today our aim is to go through a list of notable upgrades and accessories for your home defence/survival AR-15. We will also discuss the relevance of each upgrade in relation to user performance – so stay tuned.
Note: an AR-15 purchased for rural home defence may require a longer-range capability, and therefore not all home defence firearms are modified for CQB only. We may recommend some precision components, which applies to users who want improved accuracy over longer distances.
The Most Important Rifle Upgrade of All
This may seem clichéd, but none of these later upgrades matter if you don’t invest in the most important AR-15 upgrade of all: YOURSELF. A rifle is only as good as the person using it, and my strong recommendation is to invest in ammunition and training first, becoming proficient and skilled in using your AR-15 until a point at which you feel fully confident.
Entry-level AR-15’s (from reputable brands) are excellent right out of the box, and don’t need improvement. However, a good optic and weapon-mounted light are essential under many applications – home defence and survival builds for example – while the rest can wait. Once the basics have been procured, allow yourself adequate time for training and skill development in order to ascertain which upgrades will be worthwhile.
Sights & Optics
Upgrading from an iron sight system is a must. A good quality modern optic has the ability to exceedingly improve on your ability to shoot fast and accurately. You should include a good electronic dot sight or LVPO in your initial budget, making this your first aftermarket accessory on that shiny new AR-15.
In addition to enhanced speed and accuracy, these optics allow you to shoot with both eyes open – for situational awareness – while also providing an illuminated dot for use in low light conditions. The following optics are commonly used on the AR-15 tactical rifle.
- Reflex Sight (or Red Dot)
- Holographic Sight
- Prism Sight
- Low Power Variable Scope (LPVO)


If your rifle is used for duty, home defence or survival, consider irons as a backup sighting system. Flip-up sights are common, offering a low profile front and rear sight with limited exposure when stowed.

For more info on optics and some guidance on scope selection, read the following article: Semi-Automatic Rifle Scopes: Choosing The Right Optic For You
White Lights & Visible Lasers
White Light is commonly disregarded amongst AR-15 owners until such a point that skill develops and the need for light becomes apparent. It certainly isn’t needed on sporting rifles or rifles used for daytime plinking, but on a duty rifle or home defence/survival setup white light is crucial. Having the ability to light up an area of darkness may be the difference between life and death; as you can’t fight what you can’t see.
When selecting a light, it should be reliable, simple to operate, and have enough power to identify your target. Lights used indoors don’t require as many lumens as those used outside. If you require a light for both indoor & outdoor use, you may want to look for something that is capable of providing both a low and high beam.
When selecting a light for your AR-15, you can either mount a flashlight to the rifle with a purpose-built mounting mechanism, or purchase a weapon-mounted light (WML). If you decide to go with a DUAL purpose pistol/rifle WML, be aware that the side-press activation switches (as seen on the right-hand/bottom image below) can unintentionally activate, draining your battery and possibly giving away your position at night. I find this type of WML more suitable for use on pistols, and personally prefer rifle-mountable tactical flashlights on a long gun (left-hand/top image).


Article of Interest: Flashlights & Weapon-Mounted Lights: Using White Light for Home Defense
When it comes to visible laser pointers, I personally don’t find them to be very beneficial (for individual use). They add weight and bulk to the rifle, and provide little advantage to the user, so I will leave this decision up to you.
An infrared (IR) laser used in conjunction with night observation devices (NOD’s) are unbeatable when it comes to low light capability, but due to the cost of proper equipment, civilians rarely consider this as a viable option.
AR-15 Rifle Slings
The rifle sling is often thought of as a holster for your long gun, providing some essential and very useful advantages.
- The sling keeps your rifle attached to your person, allowing you to perform other tasks with both hands when needed
- Slings provide valuable weapon retention, making it a lot harder for an accomplice to forcibly take your rifle by surprise
- Some slings can help to stabilise your aim for more accurate shots
- A sling allows you to transition from rifle to pistol in a rapid and smooth progression
There are various types of slings available on the market, namely single-point, two-point and three-point variants.
The best sling for new AR-15 shooters is incontestably a quick-adjusting two-point configuration manufactured by a reputable brand. Some examples of my favourite tried and tested two-point slings can be seen below.


Magazines & Ammo Capacity
When purchasing a new AR-15, the manufacturer will usually include two or three 30-round magazines. These are typically either generic stamped steel, or leading-industry PMAG’s made by Magpul. Either way, you’ll want to consider strengthening your magazine supply.
Most rifle owners consider four 30-round magazines to be a minimum requirement. I personally place between five and seven magazines with each setup, giving me up to 210 self-propelled lead-noodles to which I can lay some hate. Now this may seem like overkill in the home defence context, but it gives me peace of mind in knowing that I can confidently respond to unforeseen incidents away from home. Take rural farmlands for example, where many of my close friends reside, or the public streets that surround my home, which may become overcrowded with violent protestors – worst-case scenario of course.
It is better to have extra ammo and not need it, than to need extra ammo and not have it
The good thing about magazines – they are relatively affordable. They also come in various sizes, from 10-round mags which are preferred on DMR builds (giving extra ground clearance), to 60-round high capacity magazines. 30-round mags are most common and satisfy the needs of most users.


Once you’ve reached a satisfactory mag count, give some thought to stripper clips and a speed loader for additional ammo storage.
Time To Go Ambidextrous
There are four recommended upgrades that can be swapped out on your AR-15 – effortlessly and affordably – transforming it into that badass ambidextrous sidekick that you’ve always needed. This may grab your attention if a) you are a left-handed shooter, or b) you intend on training at a higher level than most, employing ambidextrous shooting techniques and utilising cover (and concealment) in the best way possible. These upgrades will certainly slicken-up your drills, improving both speed and handiness.
- AMBIDEXTROUS CHARGING HANDLE

2. AMBIDEXTROUS SAFETY SELECTOR

3. AMBIDEXTROUS MAGAZINE RELEASE

4. EXTENDED BOLT RELEASE

Now I must just mention that of the four ambidextrous upgrades mentioned above, I do personally see the value in upgrading a charging handle and safety selector switch, across the board. However, the ambidextrous mag and extended bolt release are more favoured towards left-handed rifle operators only, at least in my view. In the hands of a right-handed shooter, they can present some issues. An ambi-mag release for example tends to accidentally discharge magazines when slung against the body of a right-handed operator – an embarrassing occurrence. The extended bolt release simply adds unwanted mechanics to the trigger guard, and should only be used if and when needed.
Stocks & Pistol Grips
Aftermarket stocks and pistol grips aren’t essential, but they do have a proven ability to refine comfort and enjoyment whilst shooting your rifle. Once your essentials have been purchased and your piggy-bank is still active, you may want to consider a stock and/or pistol grip. Many AR-15 manufacturers have indeed shifted away from standard mil-spec stocks and grips, supplying aftermarket products from companies like Magpul and Daniel Defence. This means that your AR-15 may have already come with a worthy upgrade, so try it out first and see if it makes the cut.


Now if you intend on using your AR-15 regularly for long-distance shots, and you have a high-quality variable scope fitted, then you should explore the precision adjustable stock. These versatile rifle stocks are adjustable for length of pull and cheek-piece height, fitting a variety of body types and shooting styles, while still maintaining close quarter capability.
Trigger Upgrades
Your trigger is the primary point of contact between you and your rifle, and improving the performance and consistency of your trigger can be one of the most important modifications you can make, but only if required. I say this for the following reasons:
- If your goal is to use your AR-15 for close range engagements, then an aftermarket trigger will provide a more pleasant shooting experience, but with little to no improvement in accuracy or capability. Under this application, a standard milspec trigger will do everything that you need, saving you some bucks.
- If you intent on shooting your AR-15 out to longer distances – in a designated marksman role for example – then a crisp, clean-breaking trigger with a consistent & light pull will make all the difference, improving both your stability and accuracy potential. Under this application I would recommend an aftermarket trigger, but only if your current trigger isn’t up to scratch.

If you do decide to purchase an aftermarket trigger, I would recommend sticking to one with a pull of no less than 3 pounds. A 3 to 5 pound trigger is great for virtually all applications including target shooting, hunting, 3-gun competitions and home defence of course; any lighter, and you run the risk of an accidental discharge when used in a tactical role.
Free-Floating Handguards
Free-floating handguards differ from standard issue, in that they only make contact with the barrel at one single point – on the barrel nut. This improves consistency in the rifle’s harmonics, promoting accuracy. If you would like tighter bullet groups on target, then a free-floating handguard is needed. These modern forends boast some additional advantages as well. Often made from lightweight aluminium, the free-floating handguard also serves as an attachment point for essential accessories such as weapon-mounted lights and sling loops, while at the same time provides superior airflow, allowing the barrel to cool quicker and retain precision.
There are various types of modern handguards to chose from if your rifle doesn’t have one already. The following are most common, each housing their own short list of pros and cons.


Both KeyMod and M-Lok are both excellent systems. If you are purchasing new, then I would recommend M-Lok as it has proven to be superior is some ways. However, if you already own a KeyMod rail there is absolutely no need to replace it.
The U.S. Military conducted failure tests with M-LOK and KeyMod before choosing one system for their own rifles. The stress testing showed that M-LOK rifles could be dropped on the ground and the accessories on the rail would stay in place, tightened, 100% of the time. KeyMod accessories only stayed in place 33% of the time.
KeyMod vs. M-LOK vs. Picatinny: AR-15 Handguards Compared
Vertical & Angled Foregrips [or Downgrips]
There are tons of arguments over whether foregrips should have a place on modern-day AR-15’s or not, with many gun enthusiasts calling them tactical gimmicks that serve no purpose, and laughing at people who use them. While they may not be required to serve the same purpose as that in which they were originally intended – to prevent excessive muzzle climb, provide additional grip surface and keep the shooter’s hand away from the hot barrel – they do still play a valuable role when positioned correctly along your handguard.
- Firstly, foregrips work very well as a reference point to position your hand in precisely the same location each time, operating lights and pressure switches with consistency when needed
- Forward vertical grips also provide additional leverage when attempting to jerk the rifle or carbine from an aggressor’s hands, who may be trying to disarm you
- You can also push/pull foregrips into barricades to stabilise shooting positions. This is called a “barrier stop” and offers a lot of stabilisation for rapid shooting
- The improved grasp when using a foregrip also allows for a more snug fit of the rifle into the shoulder, offering more resistance to recoil and improved recoil management
- Lastly, it improves ease of carry over long distance patrols. Since a rifle should always be carried correctly with two hands, the presence of a foregrip reduces stress on the support wrist, improving comfort


When attached, it is important that the foregrip is used Properly; grasping your entire foregrip when shooting is incorrect, at least in a modern context. Instead, only your pinky and ring finger should make contact with the foregrip, allowing your remaining fingers to obtain a natural grasp around the handguard, either in a C-grip or with your thumb rested at the 11 o’clock position (thumb break shooting method). This allows you to obtain maximum control over the muzzle, allowing your intuitive functions such as proprioception do as much work for you as possible. This means gripping further out and higher up on the forend, placing your support arm more in line with the barrel, which will help you aim faster, more intuitively, and with greater precision. This method of tactical shooting prefers slightly longer handguards than shorter stubby ones, so bear this in mind when making a new purchase.
Muzzle Brakes & Silencers
The MUZZLE BRAKE – do you need one on an AR-15? Some say no, while others swear by them. My experience makes me confident in saying that most AR-15 owners don’t need a muzzle brake, and won’t shoot often enough (or at the required skill level) to notice its value. However, if you intend on training often and regularly in a progressive manner, then adding a muzzle brake to your rifle will be advantageous. The device will reduce both muzzle climb and felt recoil, allowing you to maintain accuracy while rapidly firing successive rounds into your target.
Muzzle brakes are the AR-15’s most commonly upgraded component in reducing recoil and keeping the barrel steady during rapid fire
The downside to the muzzle brake is that it produces a larger muzzle flash and audible sound, which are directed back towards the shooter. This can make for an extremely unpleasant shooting experience in the presence of a newbie. So if you wish to eliminate these effects, then you need to look at a silencer (or suppressor).
SILENCERS use a series of internal sound baffles which slows and cools the escaping propellant gasses. This process reduces the intensity of the rifle’s muzzle blast; both the audible sound and visible flash. Other advantages include a reduction in felt recoil and jump angle, which all combine to provide the shooter with a more pleasant shooting experience.
But successful use of a silencer on an AR-15 is not quite as straightforward as it may seem. Fitting a silencer to your AR-15 will increase your rifle’s gas blowback, which needs to be managed. If you don’t manage this excess gas, you are going to find an increase in velocity of the bolt carrier group (BCG), which will most likely cause cycling issues. In other-words, your rifle will malfunction. This issue can be address be either:
- Adjusting the rifle’s gas block. The rifle must have an adjustable gas block in order for this to work
- Using a suppressed bolt carrier group which is designed to vent excess gas
- Purchasing a suppressor which allows gases to flow through the device instead of increasing barrel and chamber pressure
- Adding a heavier buffer weight to the rifle in order to slow the BCG down
So which muzzle device is best for you?


And Now For Some Tips & Tricks
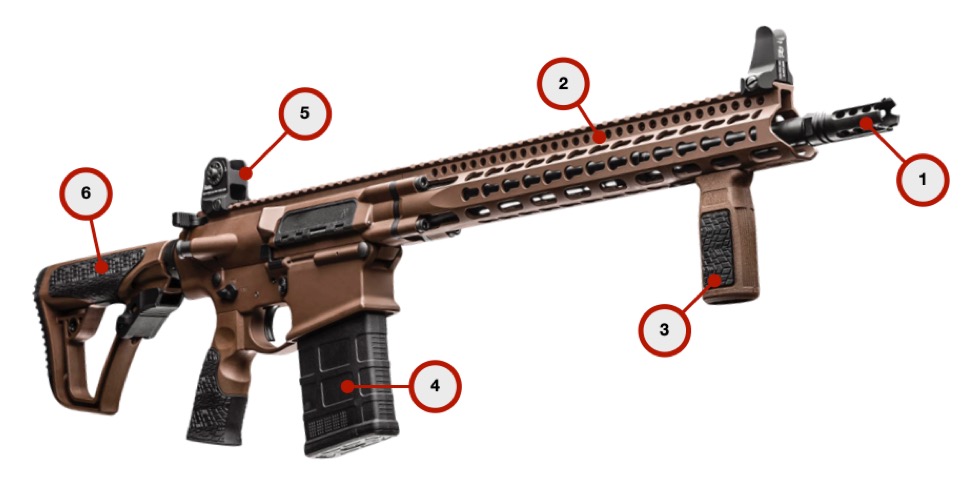
Our interactive tactical rifle offers tips & tricks that you may find useful when building or modifying your own sei-automatic rifle. It is tailored towards individual use for self defence and not for sports shooting purposes, neither is it role specific. Move your mouse curser or use your finger to press & drag over the image displayed below. You may zoom if you feel the need. Areas will highlight when interactive content is available. A quick tap of your curser/finger will open an information panel. Press the “x” or tap outside of the screen to exit the panel and continue browsing.

Weapon Mounted Lights
- While sports shooter’s don’t need them, WML’s are vital for home defence, survival use and of course real-world operations
- Half our lives are spent relying on artificial light sources in order to see; make sure you are in control of when and what you’re able to see during darkness
- Do not assume that WML’s are only for night time use. The day you need to clear a building or a storage facility with no running lights, will be the day you realised that you’ve fo*ked-up
- Don’t use cheap Chinese knock-offs, invest in a good brand that will offer reliability and performance when roughly handled
- Pressure pads are a game-changer, they allow for consistent shooting while simultaneously operating the light. This allows for proper recoil management without having to break your grip
- Use mini cable ties to secure pressure pad wiring to your handguard. Always carry spares
- Use white light only when necessary – and sparingly. Always try using short bursts of intermittent light rather than continuous beams. This is vital in keeping your location hidden and preventing pattern setting
- Run a light coat of oil or vaseline against your flashlight lens when mounted in a forward location on your rifle. This will help to easily remove carbon residue which is expelled from the muzzle, and ensure that you maintain a good focussed beam at all times
- Mount the light as close to the muzzle as possible. This will reduce the amount of light reflected from the rifle’s barrel, reducing your visual signature
- Consider mounting the light on the same side of the rifle as your strong arm/shooting hand. This will free up the space in front of your non-shooting eye, creating a clearer field of view when looking through your optic with both eyes open
- Always carry spares batteries for your WML and ensure that it is fully charged wherever possible
Rifle Magazines
- Aim to carry at least 6 full magazines on your mission-critical gear at all times
- 30-round magazines are the ideal standard for the 5.56mm caliber
- A double-stack magazine should indicate full capacity when the top round sits to the right-side and won’t depress any deeper. If it sits on the left, you may have over-loaded your mag
- 10-round magazines are an excellent choice for precision ammo on a DMR [designated marksman rifle], increasing ground clearance when firing prone
- Magazine couplers (or MagLinks) may look cool, but they only add weight and bulk to a rifle and does not speed up the reloading process – avoid them!
- Mag grips also look cool – to some 😂 – but they are counterproductive. They may be useful under certain roles, such as an aerial marksman or helicopter sniper who requires a lanyard point
- There is no issue storing magazines fully loaded for prolonged periods; the springs are designed to be stored in a compressed state, and wear out faster when loaded/unloaded repetitively
- Tapping the mag once loaded (on a helmet as per Hollywood movies) ensures that the rounds are seated correctly, but also loosens set propellant which has been stored for long durations, creating more consistent burn rates
The Handguard
- The handguard protects the shooter’s hand from barrel heat, whilst providing a point for proper grip and ultimate control of the firearm
- Longer handguards allow for a proper C-Grip while keeping the support arm extended. At the same time, a longer handguard will allow for a full-forward mount of a WML, ideally placing it in-line with the muzzle
- The Picatinny Quad Rail, KeyMod & M-Lok Handrails are all modern options. The Quad Rail is heaviest, while the M-Lok is the current preferred system. Some KeyMod manufacturers design the rail to fit QD sling mounts along the entirety of the rail, without needing a dedicated QD mounting accessory (in the KeyMod slots themselves)
- Free-floated handguards are superior and can be installed on most rifles that lack this feature. Free-floated handguards improve consistency in the rifle’s harmonics, promoting accuracy
- Avoid attaching unnecessary accessories to your handguard; only use those which add value, otherwise you are increasing weight and fatigue for no reason other than looking cool
Pistol Grips
- Cheap pistol grips often feel thin and plasticky. Upgrading to a high-quality grip has the ability to improve the grip, feel and entire shooting experience
- Most pistol grips open up at the base. Consider using this hollowed-out area to store some of the following items:
- An Allen/Hex key to remove primary optic if damaged (eg. LPVO) – engaging flip-up sights
- Spare parts kit
- Lens cleaning cloth
- Spare batteries (for scope/optics)
- Ear plugs
- Cash
Laser Pointers
When it comes to laser pointers, my advice is as follows:
- If you’re using visible laser, get rid of it – they serve very little purpose and only add weight and bulk to your rifle
- If you’re using an IR laser in conjunction with NOD’s/NVG, then good on you; the system is amazing but expensive
- Make sure that you familiarise yourself with with your laser’s limitations (max. effective distance), and mount it in a position that allows for easy manipulation of the laser, as closer to the barrel as possible
- Attaching the laser directly above or beneath the barrel will provide the most accurate point of impact as your shooting distance changes
- Don’t forget to check battery life regularly
Triggers
- Mil-spec triggers are purposefully designed with a strong pull – generally around 8lbs. They are reliable, solid, and contain a heavy pull to reduce the chances of an accidental discharge; ideal for CQB
- Rifle’s that are used for medium distance engagements as well as CQB – eg. the designated marksman rifle – will benefit tremendously from an upgraded trigger
- 3.5 – 4.5lbs is a good standard for a precision tactical trigger. Don’t go any lower as this will become a safety issue (on a tactical build, which differs from a benchrest rifle)
- You may wish to consider anti-walk/anti-rotate locking pins, which replace your AR trigger and hammer pins to ensure pins do not rotate or vibrate out of the receiver
The Buffer Tube
- Buffer tubes are either commercial grade or mil-spec
- Mil-spec tubes are thicker and stronger than commercial tubes, and cost a little more
- It is important to know which of the two tubes you have when selecting an aftermarket butt-stock, otherwise you may find that it wobbles or doesn’t fit
The Butt Stock
- Butt stocks are typically either fixed or collapsible
- Standard issue stocks are fine, but aftermarket options offer improved features such as QD sling mounts, rubberised padding and adjustable cheek-pieces
- QD sling mounts are nice to have if you run a single sling amongst a variety of rifles
- You should always check your stock to ensure that it locks in tight, and does not have any play/wobble. If it does, consider replacing it
- When it comes to telescopic stock positioning, the position which allows the stock to sit in the crook of your arm (the soft inside part where you bend your elbow) while naturally handling the pistol grip should provide the best shooting. Keep this consistent as much as possible, shortening it only during storage or when wearing a bulky plate carrier
- Mounting a tourniquet to the rifle’s butt stock seems to be a common setup for many. If you decide to follow this trend, make sure that it doesn’t interfere with your ambidextrous shooting ability. If it does, move the tourniquet elsewhere, but try to keep it on your person at all times (while handling your rifle)
Backup Sights
- Are they required? For any operational, survival or defensive rifle setup – absolutely! For sports shooting purposes, maybe not so much
- A backup sight, otherwise known as an EBS (or emergency battle sight), is commonly found in an iron-sight or mini red-dot configuration
- The EBS should sit on top of your rifle rails, on top of your primary optic, or offset – typically at 45-degrees
- Always make sure backup sights are zeroed, and check-zero them regularly
- Train with your backup sights often; simulate drills whereby your primary optic becomes unserviceable and you are reliant on your backup sight
- If you’re using flip-up sights beneath a magnifier or LPVO, make sure you have a tool handy to remove the primary optic
- Iron sights should always be placed as far forward and as rearward as possible; increasing the sight radius (distance between the front & rear sight), thus producing smaller angular errors when aiming
- When using an electronic backup sight, do not neglect the batteries, and always remember to carry spares
- Your backup sight should be treated just as well as your primary optic, as it may – during an emergency – become your primary optic
Primary Optics
- Red dots and Holographic’s are recommended for rifles which are intended for close quarters use
- Low Powered Variable Optics (LPVO’s) are recommended for rifles which are intended for close quarter’s and longer distance shooting
- Whichever primary optic you select, always ensure that it has an illuminated reticle for low-light shooting, and always make sure batteries are charged
- The primary optic should also be mounted firmly to the upper receiver and not on the handguard. This ensures that the most consistent and accurate zero is maintained
- Always carry a waterproofed lens cleaning cloth with your rifle to keep lenses clean and serviceable
- Red dots and Holographic’s can be mounted towards the front-end of the upper receiver, allowing less interference around the charging handle. LPVO’s generally mount further back to provide the best eye-relief
- Check optic screws and mounts regularly, making sure they are always torqued to the correct setting
Backup Sights
- Are they required? For any operational, survival or defensive rifle setup – absolutely! For sports shooting purposes, maybe not so much
- A backup sight, otherwise known as an EBS (or emergency battle sight), is commonly found in an iron-sight or mini red-dot configuration
- The EBS should sit on top of your rifle rails, on top of your primary optic, or offset – typically at 45-degrees
- Always make sure backup sights are zeroed, and check-zero them regularly
- Train with your backup sights often; simulate drills whereby your primary optic becomes unserviceable and you are reliant on your backup sight
- If you’re using flip-up sights beneath a magnifier or LPVO, make sure you have a tool handy to remove the primary optic
- Iron sights should always be placed as far forward and as rearward as possible; increasing the sight radius (distance between the front & rear sight) and producing smaller angular errors when aiming
- When using an electronic backup sight, do not neglect the batteries, and always remember to carry spares
- Your backup sight should be treated just as well as your primary optic, as it may some day become your primary optic
The Suppressor [or Silencer]
- Suppressors do a few things very well; they reduce noise, muzzle flash and felt recoil
- The downside is that they increase the weight and length of a firearm, therefore increasing fatigue and limiting manoeuvrability
- Suppressors are great for DMR’s and for tactical rifles designed to shoot subsonic ammunition, such as the .300 Blackout. Just bear in mind that subsonic loads will have a drastic reduction in stopping power and knockdown potential
- Suppressors should be used only when your role requires them, not just because they look cool or reduce noise
Vertical & Angled Foregrips
- When positioned correctly, foregrips work well as a reference point to position your hand in precisely the same location each time, operating lights and pressure switches with consistency when needed
- When using a foregrip, your fingers should typically be divided between the handguard and the foregrip, placing enough backwards pressure on the foregrip to keep the stock pressed firmly against your shoulder while firing
- They can also act as a barrier stop, offering more stabilisation of the rifle during rapid shooting
- The improved grasp when using a foregrip aids in recoil management and accuracy
- Lastly, they improve ease of a proper carry position over long distance patrols; reducing stress on the support wrist and improving comfort
The Tactical Rifle Sling
- Not using a rifle sling can be compared to not using a pistol holster; they are vital
- A good sling keeps your rifle attached to your person, freeing up your hands for other use. It also provides valuable weapon retention, allows you to stabilise the rifle for longer-distance shots, and allows you to transition from rifle to pistol without having to drop your firearm to the ground
- When it comes to sling selection, I would unquestionably recommend using an industry-leading two-point sling
- When mounting your sling, pay particular attention to front-end placement. Discover what works best for you, but consider a mounting location towards the rear or the rifle’s handguard, as this provides less interference when changing magazines
Let’s Round It Up
There are various other (more advanced) AR-15 upgrades that one may consider, but we have achieved our goal today in covering the basics. You should now have an idea as to what aftermarket parts and accessories you are willing to spend money on, and what can wait.
As we mentioned right from the start – the most important upgrade of all is yourself. So invest both time and money into your own training, and continue to develop progressively whilst allowing yourself to gain experience before rushing into hasty decisions.
If you enjoyed reading this post and found it useful, don’t keep it to yourself; help us spread the word – select a social share button below. And should you wish to share your thoughts or ask a question, scroll down and leave us a comment 🙂