The majority of gun owners have a critically false understanding of how bullets cause incapacitation to a living target, mostly thanks to Hollywood films. When your goal is to stop a hostile threat as fast as humanly possible, by use of a firearm in self-defence, you need to understand and achieve correct shot placement. So what is incapacitation, and how do we use correct shot placement techniques to achieve this?
Incapacitation means stopping a hostile target from carrying out his will. When a threat presents itself, not only is it important to accurately hit your target, but it is important that you can hit him well enough to abruptly halt his deadly behaviour and prevent him from further carrying out his intended action. This is achieved by selectively placing your shots (bullets) into the body’s vital organs, which can result in instant, rapid or delayed incapacitation to your threat.
A subject must be wounded in the central nervous system (CNS) or suffer a dramatic, swift loss of blood for incapacitation for occur
Today’s article aims to provide valuable information and recommended shot placement techniques to shooter’s who train for self-defence and defence against active shooter scenarios. If the following information and techniques are understood, applied and practiced so that they are engraved into your muscle memory, you will stand a far greater chance in succeeding against a hostile threat.
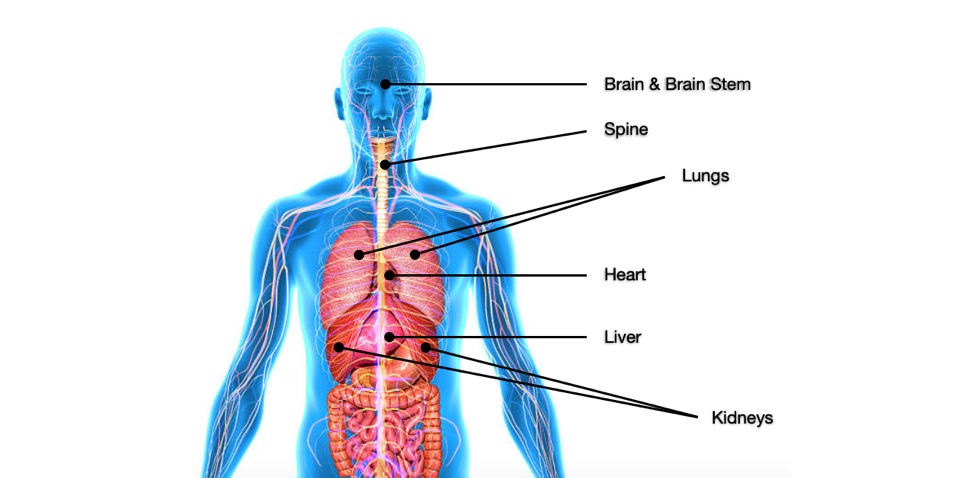
The Human Vital Organs
Shot placement is most often taught to military and law enforcement snipers under the subject of wound ballistics. This teaches experienced shooters to place well-aimed shots into vital organs, achieving incapacitation which can occur in the following three ways:
- Instant (or Immediate) – from the second that this is achieved, the target no longer presents a threat; all action is ceased. This is achieved by directly disrupting the central nervous system (CNS).
- Rapid – the threat will cease action, but he will still be able to continue his efforts for a short amount of time; typically around 10 to 15 seconds. This is generally as a result of severe blood loss or well-placed shots into the high centre chest.
- Delayed – the threat will eventually cease action, but not soon enough to prevent harm against yourself or innocent bystanders.
The majority of firearms used in self defence are classed as medium velocity weapons, and are typically found in pistol calibers. These deal far less damage (and stopping power) to human tissue than high powered rifle cartridges, and therefore require more careful consideration in proper shot placement. In other words, these medium velocity weapons lack the kinetic energy and temporary cavitation required to drop targets by aiming and hitting the torso as a whole.
The Vital Organs are essential to our survival and sustaining life, and include the brain, heart, lungs, liver and kidney

Shots to the brain stem and high spine result in instant incapacitation, while heart shots will result in rapid incapacitation. Shots to the remaining vital organs typically cause delayed incapacitation, and should not be your primary point of aim.
The Central Nervous System (CNS)
The Central Nervous System controls most functions of the body and mind. It consists of two parts: the BRAIN and the SPINAL CORD. A well placed shot into the CNS will cause paralysis, unconsciousness or death, therefore resulting in instant incapacitation of your threat.
THE BRAIN STEM
The brain stem consists of the mid brain, pons and medulla. We call this area of shot placement the T-Box.
Aiming for the T-Box provides the highest chance of destroying the brain stem, and therefore destroying your target as well.
When taking a shot from the side, this box is placed over the ear, as the brain stem sits deep inside the skull.

THE SPINE
When the spine is hit or damaged (severed, sheared, torn or crushed in any way), everything below the break becomes disabled.
A C6 injury or above results in quadriplegia, which means total loss of use of all four limbs and the torso, completely neutralising your threat.
The C6 is found at the base of the neck.

A shot to the brain stem or high spine would therefore be the most ideal means of completely disabling your threat.
The Heart Shot
The main function of the heart is to circulate oxygenated blood throughout the body, which is crucial to survival. The heart is roughly the size of the closed fist, around 8x12cm, and lies in the centre of the chest behind the breastbone, protruding slightly to the left.
When hit by a penetrating projectile, the heart suffers a loss of pumping efficiency resulting in hydraulic decompression (a bleed out) and eventually cardiac arrest. This typically takes around 10 to 15 (and up to 30) seconds to occur. The heart shot is therefore classified as rapid incapacitation, and should be your primary point of aim when engaging centre mass.
Without immediate surgery, high centre chest injuries typically lead to death, often as a result of damage to the heart and vascular system.
A Shot to the Pelvis
Now you might be wondering anyone would purposefully aim for the pelvis, but there certainly is a time and place for this particular shot placement technique. Firstly, the pelvis is a much larger target than the head, and often remains more stable than the torso when a target is moving about. But more importantly, it takes the place of centre mass shots when a threat is wearing body armour.
A shot to the pelvic girdle (click here to see an image) will more than often result in an inability to bear weight, and therefore a mobility kill; dropping your threat and preventing him from advancing or fleeing. At the same time, the pelvis can sustain severe internal bleeding, although incapacitation through this method alone would be delayed.
Centre Mass Shooting
Not so long ago we wrote an article on dry fire training (Dry Fire Training: Improving Your Shooting at Home) where we discussed the importance of training using human silhouette targets in order to build a conditioned response. This is an extremely important step in your training regime and developing your fight over flight response when attacked or threatened. In relation to shot placement, we need to pay particular attention to centre mass areas when using pre-designed or printable human silhouette targets.

As we can see by the examples above, many practice targets use the standard centre mass aiming markers, which train users to subconsciously aim towards the abdomen rather than the vital organs; too low. By modifying this centre mass to high centre mass shooting, you are far more likely to achieve rapid incapacitation of threats when needed. This can be done by placing bright stickers or aiming markers over the position of the target’s heart (or where the heart would lie) and ignoring the scoring areas supplied with each target.

Note: the same technique of placing bright stickers or aiming markers should be used on the target’s T-Box or Cranial Ocular Cavity.
Recommended Defensive Shooting Drills
Two of my favourite drills in training and developing adequate close range shot placement are as follows:
- Failure Drill – otherwise known as the Mozambican drill, this drill requires the shooter to fire two rapid shots (a hammered pair) into the high centre chest (aiming for the heart), followed by one well-aimed shot to the head (into the T-Box).
The Mozambique Drill is intended to ensure that the target is immediately stopped, by first placing two shots into the larger, easier-to-hit mass of the upper body, then, if the target is still active, following with a third, more precisely aimed and difficult head shot. Due to factors such as body armour, the bolstering effect of drugs, or failure to hit vital organs, the body shots may not be immediately effective, necessitating the third shot.
Wikipedia – Mozambique Drill
- Zipper Drill – the zipper drill requires the shooter to fire a series of rapid shots into the target, starting at the pelvis and working up (like a zipper) through the chest and finally into the head. The aim is to engage the spine and vital organs, finishing off with an instant incapacitating shot into the brain stem. The drill typically expends 6 or 7 cartridges.
Let’s Wrap It Up
You should now begin to realise that unless your defensive shots are landing in the right place, a threat is still likely to continue firing back upon you, possibly landing a fatal shot which may have been otherwise avoided. Shot placement is key!
Include both drills mentioned above (the failure drill and zipper drill) in regular training, and ensure that your range targets are displaying the correct aiming markers over the target’s centre mass and brain stem, aiming for these areas when your intention is to neutralise a threat (or threats) in the shortest amount of time.
If you enjoyed reading this post and found it useful, don’t keep it to yourself; help us spread the word – select a social share button below. And should you wish to share your thoughts or ask a question, scroll down and leave us a comment 🙂
6 thoughts on “The Importance of Shot Placement in Self Defence”